Example: Using the Send Email Action
You can use the Send Email action to send an email to interested parties (requester, service owner, and so on) when a record is in a specific state. For example, you can create Send Email actions to send emails to the incident owner team when a new incident is assigned.
See Send Email Action.
Some of the field names given in this topic may differ in the Graphical Action Designer.
1.From the Configuration Console, click Build > Automation Tools > Quick Actions to open the Actions Manager workspace. The list of business objects that have actions appears.
2.Click Add/Edit for the business object. The application displays the Action Designer selection popup.
3.Select one of the following designers:
•Graphical Action Designer.
•Classic Action Designer.
4.Click the Create New Actions tab (Classic Action Designer), or New Actions tab (Graphical Action Designer).
5.Select the action type:
•In the Graphical Action Designer, drag and drop the Send an email action type onto the Design Area.
•In the Classic Action Designer, click the Send Email action type to open the Send Email Configuration workspace.
For information on using the Graphical Action Designer, see Using the Graphical Action Designer.
For information on using the Classic Action Designer, see Using the Classic Action Designer.
6.Enter the following information:
| Field | Description |
|---|---|
| Enter action name | A name for this action. For example, New Incident Assigned. |
| Enter action description | An optional description. |
| Enter category | A category for this action. Select Notifications from the drop-down menu. |
7.In the Action Settings section, enter the following:
| Field | Description |
|---|---|
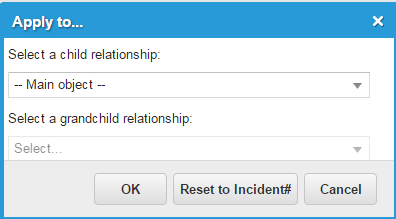
| Apply action to |
By default, the action is applied to the selected business object. However, you can select a child or grandchild business object to run this action against a relationship. The email is then sent for each instance of the child record.
Click Incident, then navigate to the child or grandchild business object, and click OK. This configuration setting is not currently available in the Graphical Action Designer. |
| Publish to | The roles that need access to this action. |
8.Customize the Send Email action by entering data into the remaining fields:
| Log in Journal |
Specifies which emails to keep. Select one of the following: All: Default. Keeps all emails. Failed: Keeps only failed emails. Log in to the application and open the Email workspace. The list in the Email workspace contains a column called Sent that indicates if the application sent the email. If you set this parameter to Failed, the application enters an N (for no) in this column. |
| From | The email address from which to send this email. |
|
To |
The email address to which to send this email. |
|
Add CC |
Recipients to be copied on the email. |
|
Add BCC |
Recipients to be blind copied on the email (not have their address listed). |
|
Address book |
Opens the address book to enter email addresses. See Using the Address Book |
|
Enter an expression |
Click Search next to a field to open the Edit Expression window. Double-click any of the folders to expand it. Select and double-click any of the functions or fields. Subject: The subject of the email. For example, Incident# $(IncidentNumber) is assigned to you. Body: The body text using expressions and field separators. From the email, you can include a URL that takes the user to the record in the business object workspace in the client application or to the record, if the business object workspace is available, in the Self-Service portal. |
9.Select the following options for attachments:
| Option | Description |
|---|---|
| Attach a file | Navigates to a file (document or image) to attach. Any format or size is permitted, but large files might not be accepted by the email server of the recipient. |
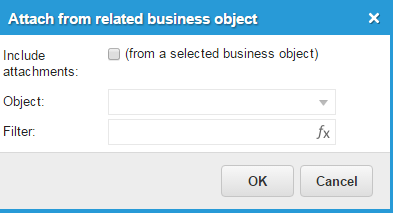
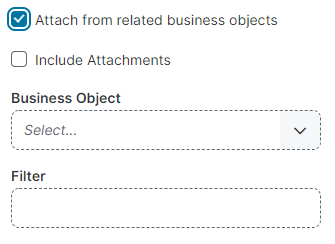
| Attach from related |
Navigates to a related business object. Click OK. Dialog in the Classic Action Designer
Dialog in the Graphical Action Designer
|
| Prompt for attachments | Prompts the user to provide an attachment when the record is saved. By default, this option is set to Off. Click to toggle between On and Off. |
10.Click Save.